Pre-Game Time - Get Your Bow Ready Now

With that said, our gear takes a beating. Starting with antelope season, then mule deer and elk. Maybe throw in an Alaskan or Canadian hunt before you find yourself hunting whitetails in November. Then December rolls around and you just might be heading down to Arizona for javelina and deer season or even a sprint down to Texas. Before you know it, it is turkey season and you’re putting in for tags all over again.
Just one of these seasons will put your equipment under both physical and environmental stress, unlike that of the spring and summer leading up to the hunting season. So before you ramp it back up this season, now is the perfect time to learn how to assess your bow (without a bow press). Take this time to either learn how to service your own equipment or have it serviced at your preferred archery pro shop.
The following is a simple but effective process to assess your bow through a series of techniques to include visual inspections, relative alignments, and physical checks. So don’t wait, now is the time to get your gear lined out when you have time and your bow technician does too.
String, Cables and D-Loops
Of all the items that make up modern compound and traditional bows the most important is your strings and cables. They are at the heart of your bow’s performance. A poor or old set of strings and cables can stretch causing cams to come out of time, your poundage and draw length to increase, and/or your peep sight to rotate.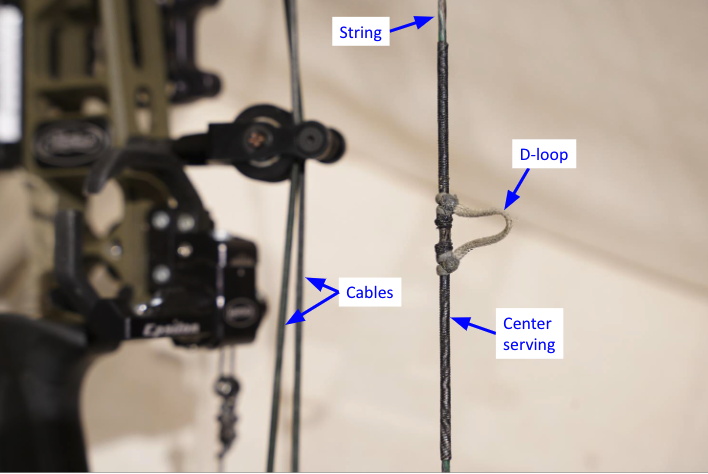
Most modern bow strings are made up of 24 individual strands that have been twisted into two separate and equal bundles. These are then twisted into one bundle like a rope. This single bundle is then put under high linear tension to get each strand and bundle to seat in and equilibrate at that tension.
This is also known as pre-stretching the string. The twisting of the string bundles ensures that each strand, as it wraps around the circumference of the cam, is of equal length thereby distributing the force equally between each strand.
Visual Inspection
Inspect your strings and cables for fraying of the main string bundle and for serving separation. Some key areas to inspect are where the string and cables wrap around the cam, as well as near the D-loop. While doing so, look closely in the areas where the peep is tied in. These are the most likely areas where a strand can be frayed to the point where a single strand or multiple strands can be at the verge of breaking or already have failed.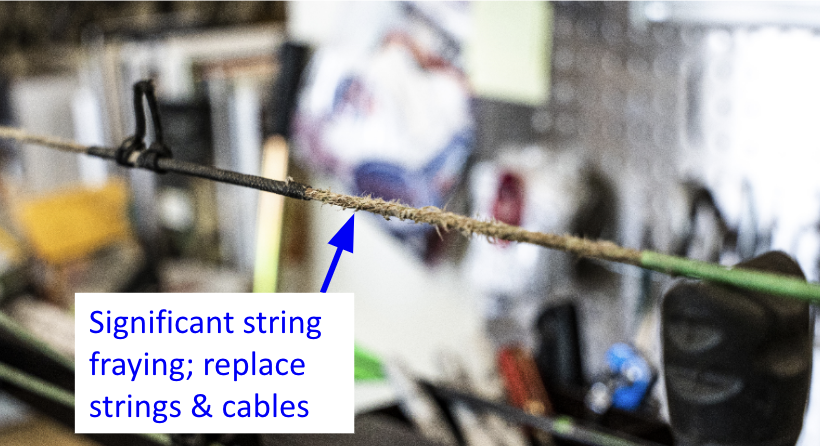
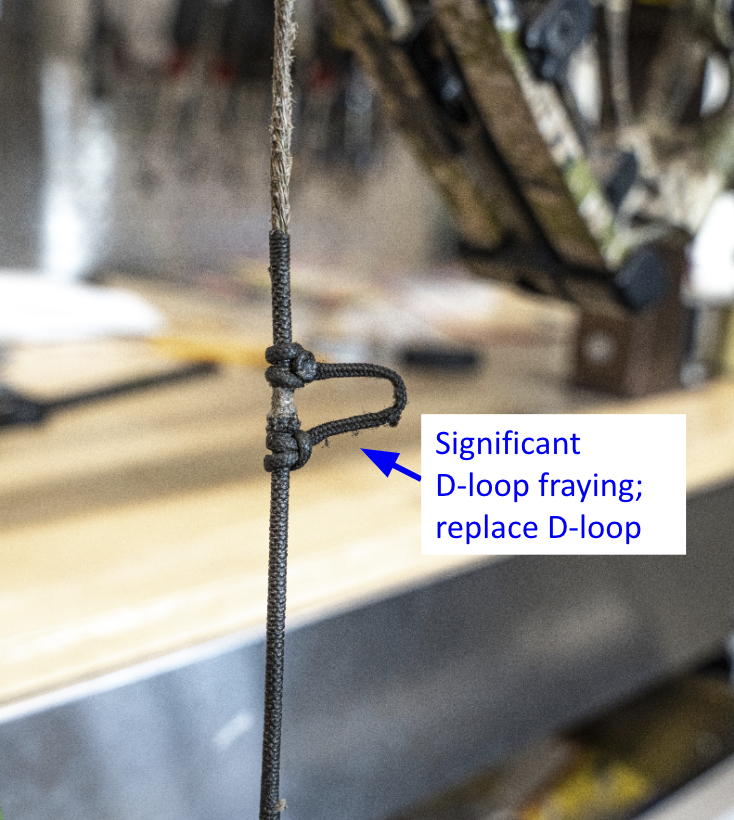
As for D-loops, they are constructed with a center core of nylon (usually) surrounded by a braided tube that can vary in material type. When you think about the force that is concentrated on the tiny surface area of the D-loop, the details of your release aid hook and the number of shots taken, it becomes obvious that this is a prime area for fraying.
There is nothing more frustrating (and painful) than a D-loop breaking when coming to full draw. D-loops are extremely inexpensive and easy to replace. Always remember to record the length of your D-loop to ensure replacement is accurate and precise.
Relative Assessment:
Your cables directly transfer the force of the limbs to the opposite cam opposed to the string. For your cams to stay synchronized for optimum performance, it is assumed that the length of each cable does not change over time. Don’t forget, a new set of strings and cable needs to “settle-in”. This should take about 50-100 shots.
With the cables being under higher loads than the string, over time, a cable can increase (i.e. creep) in length compared to the other. The result is your cams are no longer synchronized and one draw stop will make contact before the other. This results in porpoising of the arrow during flight (high or low paper tear) and/or lower or higher groups. With broadheads, the results are larger groups at closer ranges, especially with fixed blade broadheads.When your cams are synchronized (timed correctly), as you come to full draw and approach the draw cycle wall, you will feel one “wall” when both draw stops make contact at the exact same time. If your cams are not timed, there will be a first draw-force “bump” closely followed by the “wall” because the draw stops are hitting at different times.
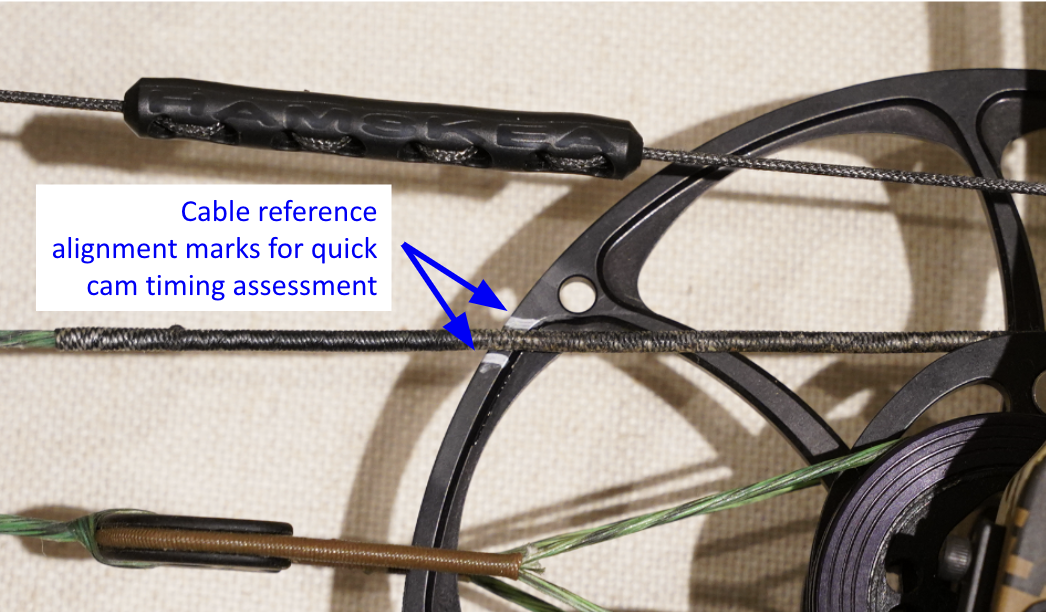
This is an indication that your cams are out of sync and your cables and may need an adjustment or replacement. Another way you can check for cam timing is to visually reference your cable orientation to a feature in the top cam. Compare that to the same relative feature orientation on the bottom cam. They should be exactly the same.
If they are not, most likely, one of your cables has increased very slightly in length. This is one of the most sensitive changes in your entire system. One ½ turn of a cable can bring everything back into time. Be aware, it doesn’t take much for your cams to become unsynchronized.
A good policy is to replace your strings and cables every year along with your D-loop. Do this in the early spring to give yourself and your dealer plenty of time. If your cables are in good condition, it is not uncommon to replace them every other year.
Note: When your bow is shooting great and everything is in tune, mark your cable reference on your cams for future quick and easy assessment of cam timing.
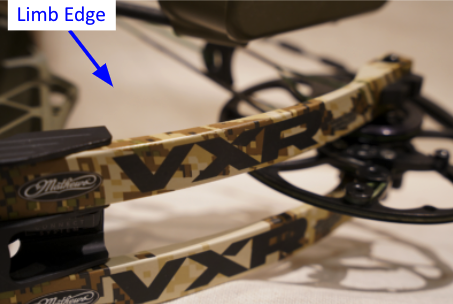
Limbs
Visual Inspection
The limbs on your modern bow are either monolithic in construction, with embedded long glass fibers, or a laminate construction with sheets of carbon fiber in conjunction with other materials fused together under high temperature and pressure. The top and bottom of the limbs have the highest shear force at full draw. Any small nick in those surfaces concentrate that force on the imperfection causing a crack or ultimate failure.
Most of the time a “splinter” will appear on the outside edge of the top of your limb(s). If this is the case, do NOT wait! Get them replaced now. If you have a significant “ding” or nick on the outside edge of your limb, have your pro shop take a closer look and get a definitive diagnosis and recommendation.
Relative Inspection
It was the end of the season and I hung my bow up. When I started the process of tuning it back up, I noticed I had a significant right tear when paper tuning.No matter what I did from moving the rest, adjusting the cam timing, changing the arrow spine and the like, it never changed. Frustrated, I reached out to one of the best in the business (Devin Hall) and had him look at my bow.
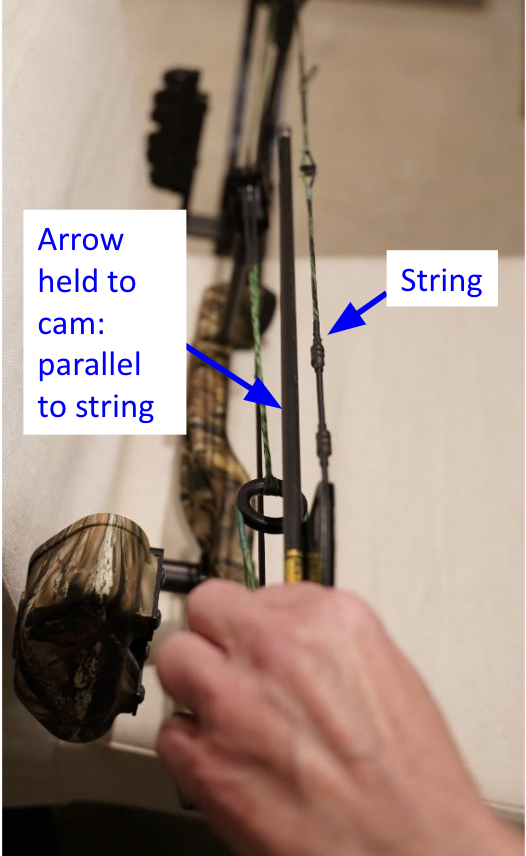
He quickly diagnosed the problem to be a deterioration in one of the limb’s deflection. How he surmised this was quite simple and effective. By holding an arrow to the side surface of the cam, relative comparison can be made between the string and the arrow.
If they are parallel, your limb deflections are just fine. If there is a large angle between the arrow and your string, most likely one of your limbs is losing its deflection (bending force) causing the cam to lean.
Cam lean can also be caused by yolk tuning or cam shimming (Mathews top hats) being sub-optimum. However, if a limb’s deflection is degrading, you most likely cannot compensate for it with yoke tuning or cam shimming.
So keep in mind that limbs can degrade subtly over time, like mine did. Be careful, the result may be a catastrophic physical event. In my case, my limbs were replaced and the bow shot like it was new. If you have any questions about the condition of your limbs, visit your local pro shop.
Cams
Visual Inspection
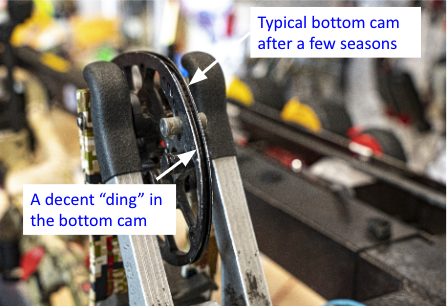
I don’t know about you, but my bottom cam takes a beating over a season. No matter how much I try to keep it from touching the ground, inevitably it does. The result is a series of small nicks/dings in the top surface of the string groove.If one of these dings is bad enough, it will cause the end serving on your string to start to fray. Worst case scenario, this can/will cut through your serving and even a strand or two. So if you have an end serving problem, check the cam for dings as a root cause.
Sometimes you can smooth them out with fine grit sandpaper. There is nothing worse than having a new set of string put on your bow, only to have the cam groove surface shred your new string.
Physical Inspection
Almost all modern compound bows have ball bearings in the cams. Although ball bearings are extremely robust, they can wear over 10,000’s of shots. The degradation is hard to detect because there is nothing to really see. What you might notice is the bow doesn’t hold like it should or your groups start to open up when nothing else has changed. There are two conditions for bearing wear. They are when one bearing wears more than the other and when both wear about the same amount. In either case, grip your cam at the top and bottom, rock or wiggle it and listen or feel for a click. If this happens, it is time to get them replaced or just replace the entire cam. This also works very well if you have an older bow with sleeve bearings.
Bow Riser
In the modern era of compound bows, you rarely hear of any bow riser issues. The most common issue is when you put your bow in a bow press to change out strings and cables or limbs. In this case, always make sure to back off the limb bolts to reduce the force required to press the bow. This reduces the amount of force applied to the riser. If you do suspect your riser is out of alignment, visit your preferred archery pro shop for a comprehensive diagnosis.
In Summary
The relative cost to replace your strings, cables, D-loop, limbs or cams ranges from $10 - $250. Compare that to buying a new bow and the economics start to make a lot of sense. But the real takeaway here is, you need to be inspecting and know how to inspect your equipment every time you use it. If you haven’t done it in a while, now is the time. Don’t be “that bowhunter” that rushes into the pro shop three weeks before season asking for a new string and cable set plus a tune up when you had several months to get it done.
Do. It. Now.
By: Andrew Munsell from Hamskea Archery
Pro-shop photos at No Limits Archery